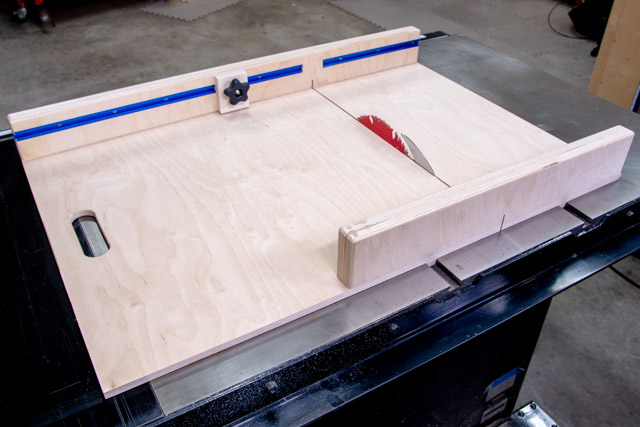
A table saw sled is a simple jig that allows you to make accurate, repeatable cuts with your table saw. It consists of a base that rides along the miter gauge slots on your table saw and a fence that is attached to the base. The key to making an accurate cut with a sled is to ensure that the fence is perfectly perpendicular to the base and that the blade is set at the correct height.
To make a sled, start by cutting a piece of plywood or MDF to size the base. Then attach a straight edge (such as another piece of plywood or aluminum) to one side of the base, flush with the top edge. This will be your fence.
Next, drill some holes in the base and install T-track (or similar). This will allow you to easily attach and remove your fence without having to drill new holes each time. Finally, calibrate your sled by making test cuts and adjusting as necessary until it cuts accurately every time.
- Measure the length and width of your workpiece.
- Cut two pieces of plywood to these dimensions, plus 1/4″ on all sides.
- Glue and clamp the pieces together with the extra 1/4″ overlapping at the edges.
- Drill a hole in each corner of the sled, large enough to fit a bolt through.
- Cut four stops from scrap wood, one for each side of the sled (these will keep your workpiece from sliding around while you’re cutting it).
- Attach the stops to the sled with screws or bolts, making sure they’re flush with the top surface of the sled.
- Your table saw sled is now ready to use!
Table Saw Sled Runners
If you’re looking for a way to make your table saw more versatile, try adding sled runners. Sled runners are simply strips of metal or plastic that attach to the bottom of your saw’s fence and help guide your workpiece as you make cuts. Most runners are made from aluminum or steel, which is why they’re sometimes called “metal track.”
But there are also some made from polymer materials like Delrin, which is a strong but lightweight plastic. And still, others are even made from wood! Sled runners come in different widths to fit different-sized table saw fences, and they can be either straight or curved to match the shape of your blade.
Some companies sell pre-made sleds with built-in runners, but you can also easily add them to an existing sled or build one from scratch. Whatever material you choose, just be sure to get smooth, Even if your stock is already cut perfectly square, it’s important that the front and back edges of each runner be exactly flush with each other so the workpiece doesn’t bind as it slides through the blade.
You may need to file or sand down the edges of your runners a bit to achieve this perfect fit. Adding sled runners to your table saw is a great way to improve its accuracy and versatility – give it a try!
Credit: fixthisbuildthat.com
What is the Best Material for a Table Saw Sled?
There are a few different materials that can be used for a table saw sled, but the best material is definitely plywood. Plywood is strong and stiff, yet lightweight and easy to work with. It also has a smooth surface that will help your sled slide across the table saw blade without getting stuck.
How Do You Make a Table Saw Sled Runner?
A sled runner is a quick and easy way to make accurate cuts with a table saw. By following these instructions, you can make your own sled runner in no time!
First, you will need to gather your materials.
You will need a straight piece of lumber that is at least 1” x 6”, a saw blade guard, screws, washers, and nuts. You will also need a drill and drill bit that is slightly larger than the screw shaft.
Next, attach the saw blade guard to the straight piece of lumber using screws.
Be sure to use washers between the head of the screw and the wood, as this will prevent the wood from splitting. Once all screws are in place, tighten them down securely with nuts.
Now it’s time to drill your holes for the sled runners.
Drill two holes near each end of the board, making sure they are evenly spaced apart. These holes should be just large enough for your sled runners to fit snugly inside.
Finally, insert your sled runners into the drilled holes and you’re all set!
Your new table saw sled runner is now ready to use.
What is the Best Wood for Table Saw Sled?
There are a few different types of wood that can be used for a table saw sled, but the best option is definitely hardwood. Hardwood is more durable and stable than softwood, so it will help to keep your sled in place while you’re working. It’s also less likely to warp or crack over time.
If you’re looking for a specific type of hardwood, maple is a good option. It’s strong and dense, so it won’t move around while you’re cutting. It also has a smooth surface, which will help to prevent your material from slipping while you’re working.
Another thing to keep in mind when choosing wood for your sled is the thickness. You want to make sure that the wood is thick enough to provide support, but not so thick that it makes it difficult to move your sled around. A thickness of 1-1/2 inches should be sufficient.
When you’re ready to start building your sled, be sure to measure twice and cut once! With careful planning and execution, you can build yourself a great table saw sled that will last for years to come.
What Size Should I Make My Table Saw Sled?
Assuming you are referring to a cross-cut sled for your table saw, there are a few things to consider when deciding on the size.
First, think about the largest piece of material you will need to cut. The sled should be at least as wide as this piece of material, and preferably wider so that you can clamp it down securely.
Next, consider the length of the sled. This will be determined by the depth of your table saw throat plus a little extra so that the material can slide past the blade without hitting it.
Finally, think about how thick you want the sled to be.
A thicker sled is more stable and less likely to warp over time, but it also takes up more space in your workshop. Choose a thickness that strikes a balance between these two factors.
How to make a simple cross-cut sled for your table saw – DIY
Conclusion
A table saw sled is a great way to make precise cuts in wood. It is especially useful for making long, straight cuts. To make a table saw sled, you will need a piece of plywood, some clamps, and a few other tools.
First, mark out the area on the plywood where you will be cutting. Then, use a drill to create pilot holes for the clamps. Next, attach the clamps to the plywood.
Be sure that they are evenly spaced and that they are tight against the wood.
Now it’s time to start cutting! Place your wood on the sled and line up your cut with the blade of the saw.
Slowly push the wood through the blade, being careful not to move it too fast or too slow. Once you’re finished cutting, remove the clamps and enjoy your perfectly cut piece of wood!
Table of Contents