Step 1: Unplug your table saw.
Step 2: Raise the blade to its highest position.
Step 3: Remove the throat plate, which is the metal piece that covers the area under the blade.
Step 4: Loosen the arbor nut, which is a large nut located in the center of the blade. You will need a wrench for this.
Step 5: Remove the old blade and install the new one. Be sure that the teeth of the blade are pointing downwards.
Step 6: Tighten the arbor nut and replace the throat plate.
- Unplug the table saw and make sure it’s turned off.
- Raise the blade to its highest position.
- Remove the throat plate if your saw has one.
- Use a wrench or Allen key to loosen the arbor nut, which holds the blade in place.
- Take off the old blade and put on the new one, making sure that the teeth are pointing in the right direction (toward the back of the saw).
- Tighten the arbor nut until it’s snug, but be careful not to overtighten it or you could damage the threads.
- 7a) If your saw has a throat plate, put it back on now and tighten its screws;
- 7b) If your saw doesn’t have a throat plate, lower the blade all the way down now before continuing the next step.
How to Change a Table Saw Blade Dewalt
If you’re a woodworker, then you know that having a sharp and well-maintained table saw is crucial to your success. Over time, the blades on your table saw will become dull and will need to be replaced. Replacing the blade on your Dewalt table saw is a relatively easy process that only takes a few minutes. Here’s how to do it:
1. Unplug the table saw from its power source.
2. Raise the blade to its highest position using the elevation knob.
3. Loosen the arbor nut with an arbor wrench or socket wrench (be sure to use one that fits snugly so you don’t damage the nut).
4. Remove the old blade by pulling it off of the arbor shaft.
5. Clean off any debris from the arbor shaft with a clean cloth or brush.
Credit: www.homedepot.com
How Do You Put a New Blade on a Table Saw?
Assuming you are referring to a standard 10-inch table saw blade, the process is as follows:
1. Unplug your table saw.
2. Raise the blade to its full height using the adjustment knob or lever.
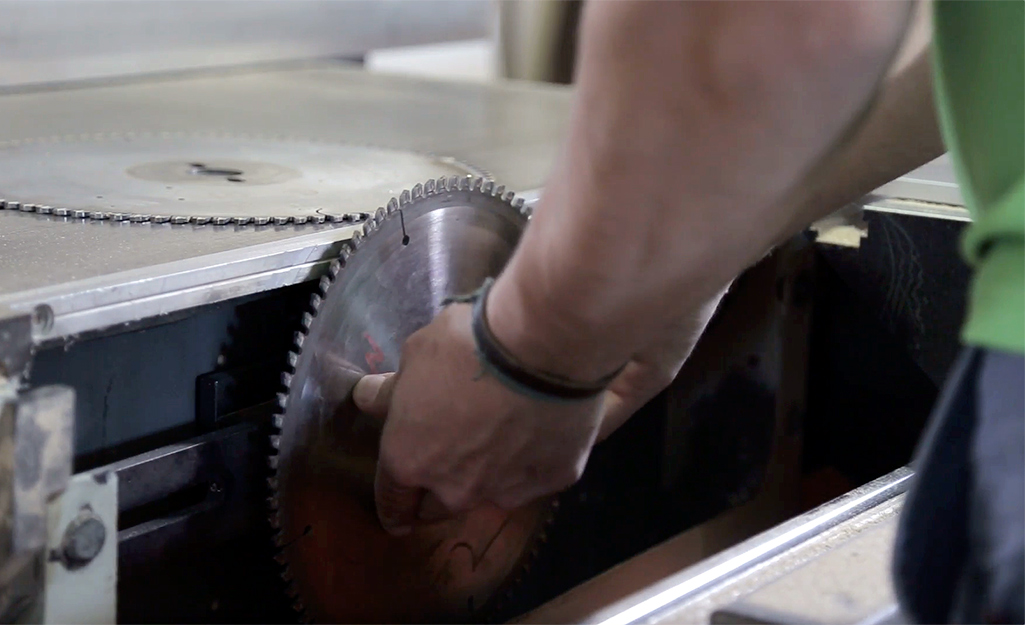
3. Loosen the arbor nut, which is located in front of the blade, using a wrench. Be sure to hold onto the blade with one hand while loosening the nut, as it will become unsecured and could fall off and cause injury.
4. Remove the old blade by pulling it off of the arbor shaft. Note which way the teeth are pointing so that you can install the new blade with the same orientation.
5. Place your new blade on the arbor shaft so that the teeth are pointing in the same direction as they were on the old blade, and tighten down securely using your wrench (be sure not to overtighten!).
6. Lower your blade back down to its original position and plug your table saw back in before testing it out with a few scrap pieces of wood!
Which Way Do You Turn to Loosen a Table Saw Blade?
Most table saws have a blade guard that covers the blade when it’s not in use. To change the blade, you first need to remove the guard. The process for doing this varies depending on the model of saw but usually involves removing a few screws or bolts.
Once the guard is off, you can access the blade and loosen it with a wrench.
How Do You Change the Blade on a Craftsman Table Saw?
If you need to replace the blade on your Craftsman table saw, follow these steps. First, unplug the saw from its power source and make sure it is turned off. Next, remove the throat plate by loosening the screws that hold it in place.
With the throat plate removed, you will be able to see the arbor nut. Use a wrench to loosen and remove the arbor nut.
Now that the arbor nut is removed, you can pull out the old blade.
Be careful when handling the old blade, as it may be sharp. Install the new blade onto the arbor and make sure that all of the teeth are pointing in the same direction. Once the new blade is in place, put the arbor nut back on and tighten it with a wrench.
Finally, put the throat plate back on and secure it with screws. Plug in your table saw and turn it on – you’re ready to start cutting again!
How Do You Change a Table Saw Blade Without an Arbor Wrench?
If you’re looking to change your table saw blade without an arbor wrench, there are a few different ways you can go about it. One option is to use a regular wrench to loosen the bolt that secures the blade in place. Once the bolt is loosened, you can then remove the old blade and replace it with a new one.
Another option is to use a pair of pliers to grip the old blade and twist it until it comes loose from the arbor. Again, once the old blade is removed, you can then install a new one in its place. Whichever method you choose, just be sure to exercise caution and follow all safety protocols when working with power tools like table saws.
How to Change a Table Saw Blade | Rockler Skill Builders
Conclusion
If you’re like most people, you probably don’t think about changing your table saw blade very often. But if you use your table saw on a regular basis, it’s important to change the blade regularly to keep it sharp and in good condition. Here’s how to change a table saw blade:
1. Unplug the table saw from the power source.
2. Raise the blade guard and remove the old blade.
3. Install the new blade by aligning it with the arbor shaft so that it spins in the correct direction (consult your owner’s manual for guidance). Make sure that the teeth of the blade are pointing down when you install it.
4. Tighten the arbor nut to secure the new blade in place (again, consult your owner’s manual). You want to be able to spin the nut by hand, but not too easily – it should be snug but not overly tight.
Table of Contents