1. Begin by measuring the space where you intend to build the miter saw station and decide on the size of your station. 2. Gather all necessary materials, such as wood boards, screws, hinges, handles and other hardware. 3. Cut two pieces of wood for the base that will be large enough to fit your miter saw in it and a shelf above it for storing additional tools or items related to your project.
4. Assemble the base using screws or nails so that it is sturdy and secure when complete. 5. Measure out and cut four support legs from 2x4s for added stability if desired; attach them securely with nails or screws depending on what type of material you are working with .
6. Make sure everything is level before continuing onto the assembly of any shelving compartments.
7. Use pocket holes along with glue & attached boards together, making sure they are flush at each end before attaching them together with pocket hole screws
8. Add shelves according to measurements taken earlier, attaching firmly
- Step 1: Gather Materials – To build a miter saw station, you will need several boards of plywood and other materials such as screws, bolts, nails and glue
- Make sure to measure the space where you’ll be building your station before gathering supplies
Step 2: Cut Plywood Boards – Using a circular saw or table saw cut the plywood into pieces that will fit in the area where it needs to go - Measure twice before cutting once!
Step 3: Assemble Frame – Connect the four sides using wood glue and screws or nails to create an open square frame. You may want to use clamps while assembling, if needed for extra support and stability - Step 4: Attach Sides – Once your frame is complete attach two side panels on either end of one side of your frame for added strength and stability
- Use wood glue along with screws to make sure everything stays in place when building your miter saw station
-
Step 5: Add Support Pieces- Depending on what type of miter saw you have add any supports needed for additional support like shelf brackets etc - These can also help keep things organized while working with larger items like lumber etc,
-
Step 6: Mount Miter Saw – Carefully mount your miter saw onto the top panel, making sure all mounting points are secure with nuts/bolts & washers (if necessary) - Also, make sure all electrical connections are properly made following the manufacturer’s instructions & recommendations at this stage too
Credit: www.diymontreal.com
How Long Should a Miter Saw Station Be?
When selecting the length of your miter saw station, you should think about how large of a workspace you need. If you plan on cutting larger items such as 8-foot 2x4s or 4×8 sheets, then it’s best to select a longer station. However, if you are just planning on making smaller cuts, then a shorter station will be sufficient.
The general rule is that your miter saw station should be at least 6 feet long to provide enough space for comfortable and accurate cutting. Additionally, make sure there is ample room around the saw stand so that any dust created while using the tool can safely escape without disrupting other areas in your shop or garage.
How Do You Make a Simple Miter Saw Table?
When building a simple miter saw table, the first step is to decide on the size. Consider where it will be stored and what tools you plan to use with it. Once you have determined the size, cut two pieces of plywood or MDF board for the top and bottom frame.
Secure them together using screws or nails so that they are flush with one another. Next, measure and cut four boards for each side panel and attach these panels perpendicularly to the frame using screws. Finally, add a backboard if desired; this can help keep your materials from slipping off while cutting.
Be sure all panels are securely attached before adding any hardware such as knobs or handles for easy movement when in use. Now your basic miter saw table is ready for use!
How Deep Should a Miter Saw Station Be?
The depth of a miter saw station should be determined by the size and type of miter saw being used. Generally, most miter saws require at least 20 inches deep for clearance to make cuts safely. If you have a larger or more powerful miter saw, such as a sliding compound miter saw, then your station needs to accommodate that extra space requirement.
Also consider any accessories you may have installed on the front of the machine when determining an appropriate depth for your workstation. Additionally, it is important to account for additional space needed around the sides of your machine in order to comfortably stand while operating it.
How to Make a Stand for Miter Box?
Making a stand for your miter box is an essential step if you want to get the most out of it. To start, measure and cut four pieces of hardwood into 30-inch lengths. Next, attach two pieces together using wood glue and 3-inch screws on the ends to create a rectangle frame.
Then, position the other two pieces in place so that they form an “X” shape at the center of the frame and secure them with more screws. Finally, drill holes along each side of both pairs of boards that will hold 2x4s in place as legs for your stand; insert these supports into their respective slots and secure tightly with nuts and bolts from underneath. Once completed, you have a sturdy base for your miter box that can be adjusted easily whenever needed!
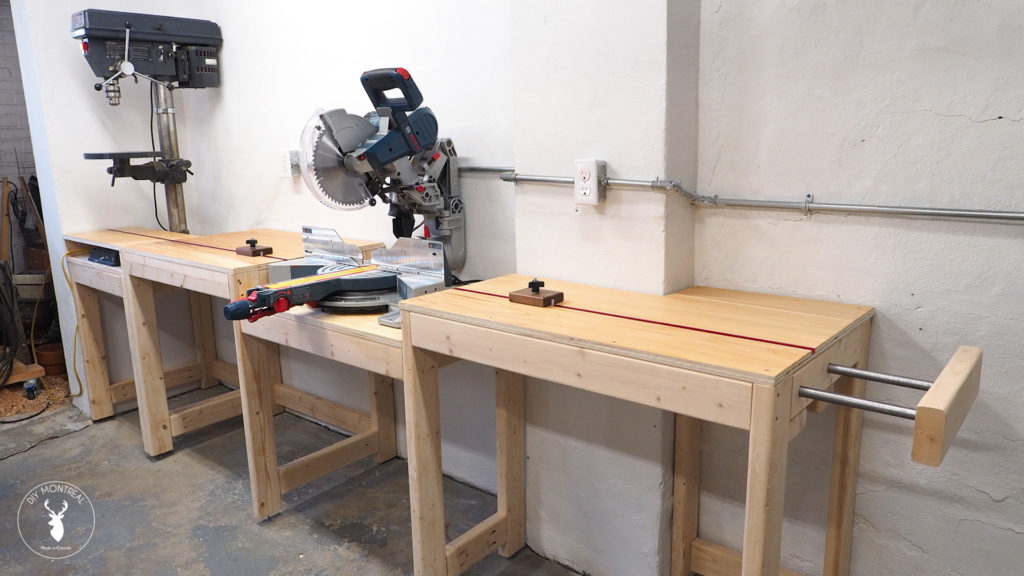
Build This Simple Miter Saw Table with T-Track | FREE PLANS
Simple Miter Saw Station
A simple miter saw station is a great way to make your woodworking projects easier and more organized. It consists of a stand with an attached table that holds the saw, as well as shelves or drawers for storing tools and materials. The adjustable angle feature allows you to accurately cut angled pieces of wood, making it perfect for any project from furniture building to trim work.
With its portability and versatility, this type of miter saw station can be used both in a workshop or even out on the job site.
Miter Saw Table Plans Free
If you are looking for free miter saw table plans, there are a number of websites that offer detailed instructions and diagrams to help you build your own. These plans typically include step-by-step instructions as well as illustrations showing the dimensions of each part. Depending on what type of materials and tools you have available, these plans can be tailored to fit your needs.
With some basic carpentry skills and the right tools, building a miter saw table is an easy DIY project that will save time and money in the long run.
Ultimate Miter Saw Station
The Ultimate Miter Saw Station is an all-in-one workstation that can turn any miter saw into a more efficient and comfortable tool. It features ample storage, adjustable shelves, integrated dust collection ports, and a sturdy steel frame construction to maximize workspace. Built with heavy-duty caster wheels for easy portability, this station also includes an adjustable outfeed support system to help ensure accurate cuts every time.
With the Ultimate Miter Saw Station you’ll be able to tackle any project in half the time – no matter where you go!
Conclusion
Building a miter saw station is an easy and rewarding project that can help you optimize the workspace in your shop. It gives you more room to work with, as well as providing a safe place for all of your tools. With the right materials and instructions, anyone can make their own miter saw station at home.
This project is not only functional but also aesthetically pleasing, making it perfect for any workshop or garage space. By following these simple steps, you’ll be able to create a beautiful and sturdy miter saw station that will last for many years to come!
Table of Contents